Elements of a Well-Written Arrangement
Before diving in, if you haven't already chosen a tool to write your arrangements in, check out our guide to the best free music notation software for new arrangers.
Your goal as an arranger is to make an inspired piece that is both playable and easy to read. Here we'll focus on some specifics that will give you some tips to write better sounding music and help you stay mindful of potential problems that could arise.
Playability
It's tempting to hit play on your score, hear a wonderful-sounding piano arrangement and begin the process of patting yourself on the back. It's more than OK to write an arrangement you can't perform yourself just yet. However, you need to check that what you've written is both physically possible to play and in line with your target performer's proficiency level.
Most playability issues come down to chord intervals being too large and the ability to move from one note to another in a given amount of time successfully.
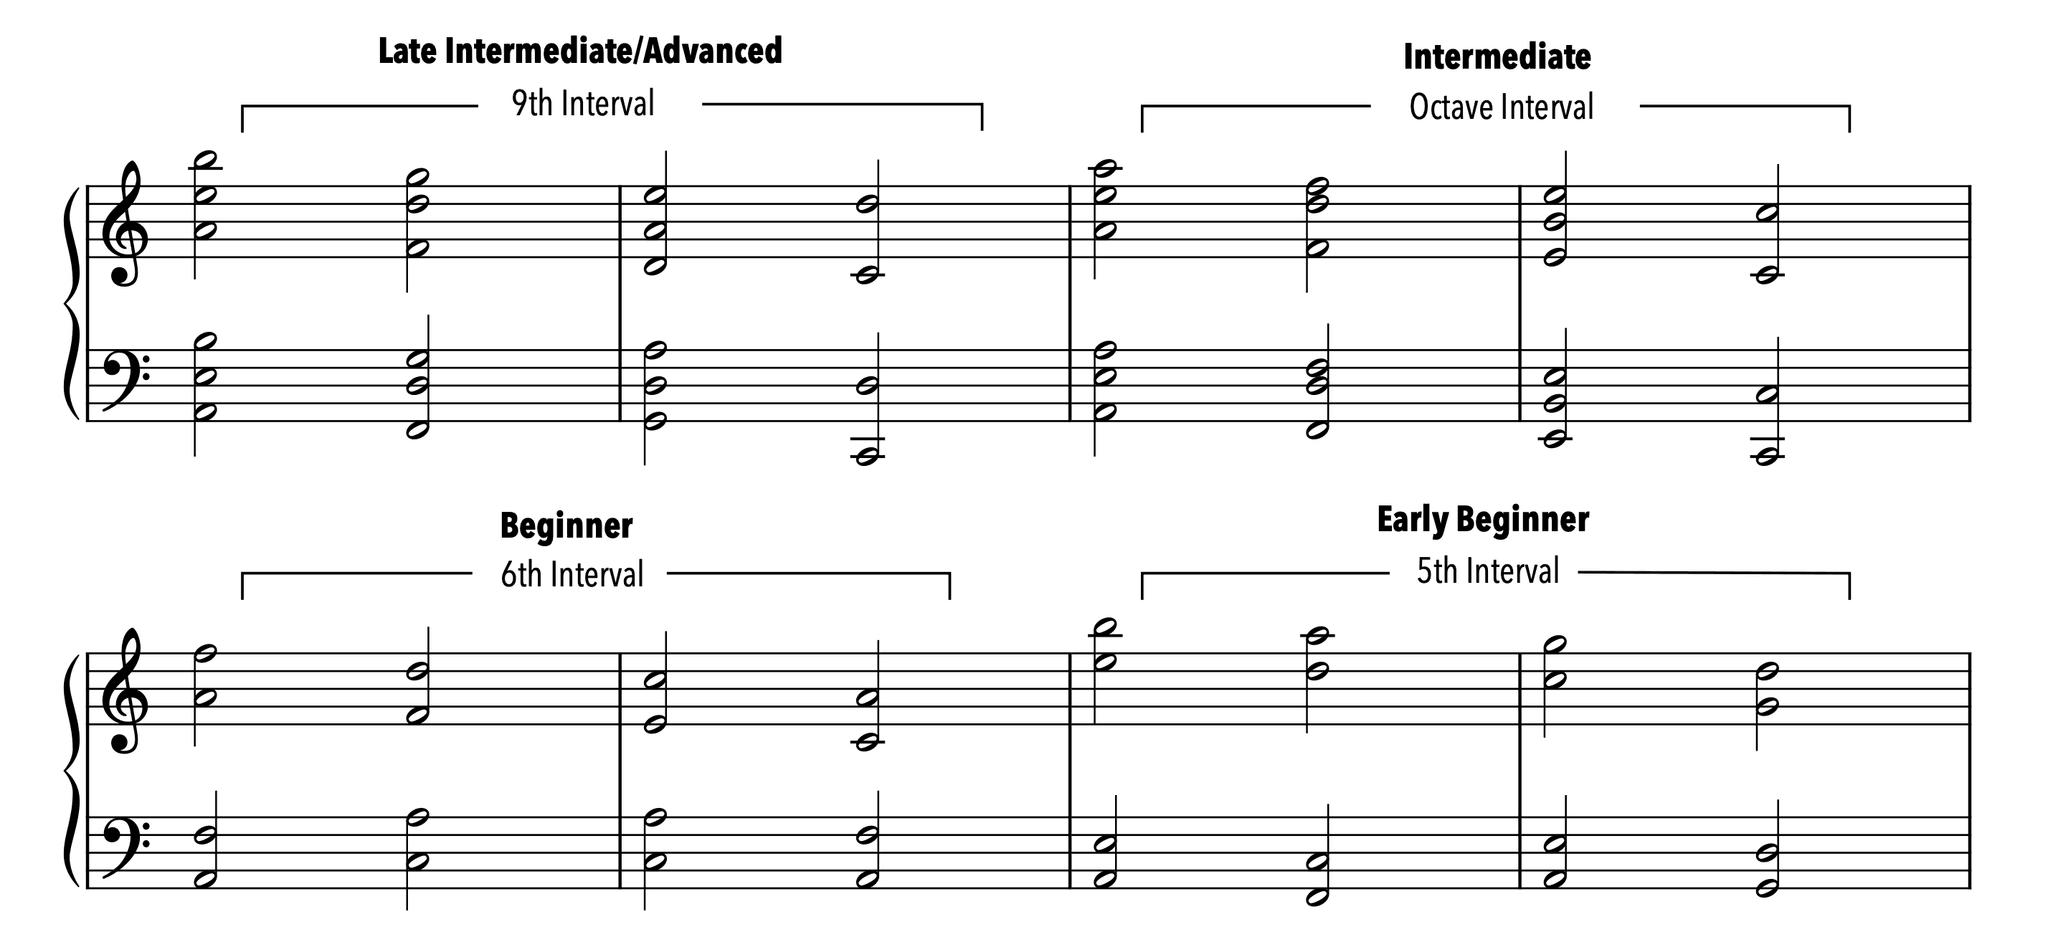
Chord Interval Limits by Skill Level
Unless Shaq has commissioned you to write his next piano masterpiece, you should assume there are some hand size limitations that will come into play. As a general rule of thumb, a late intermediate/advanced player is unlikely to play above a 9th, an intermediate player above an octave, a beginner above a 6th, and an early beginner above a 5th.
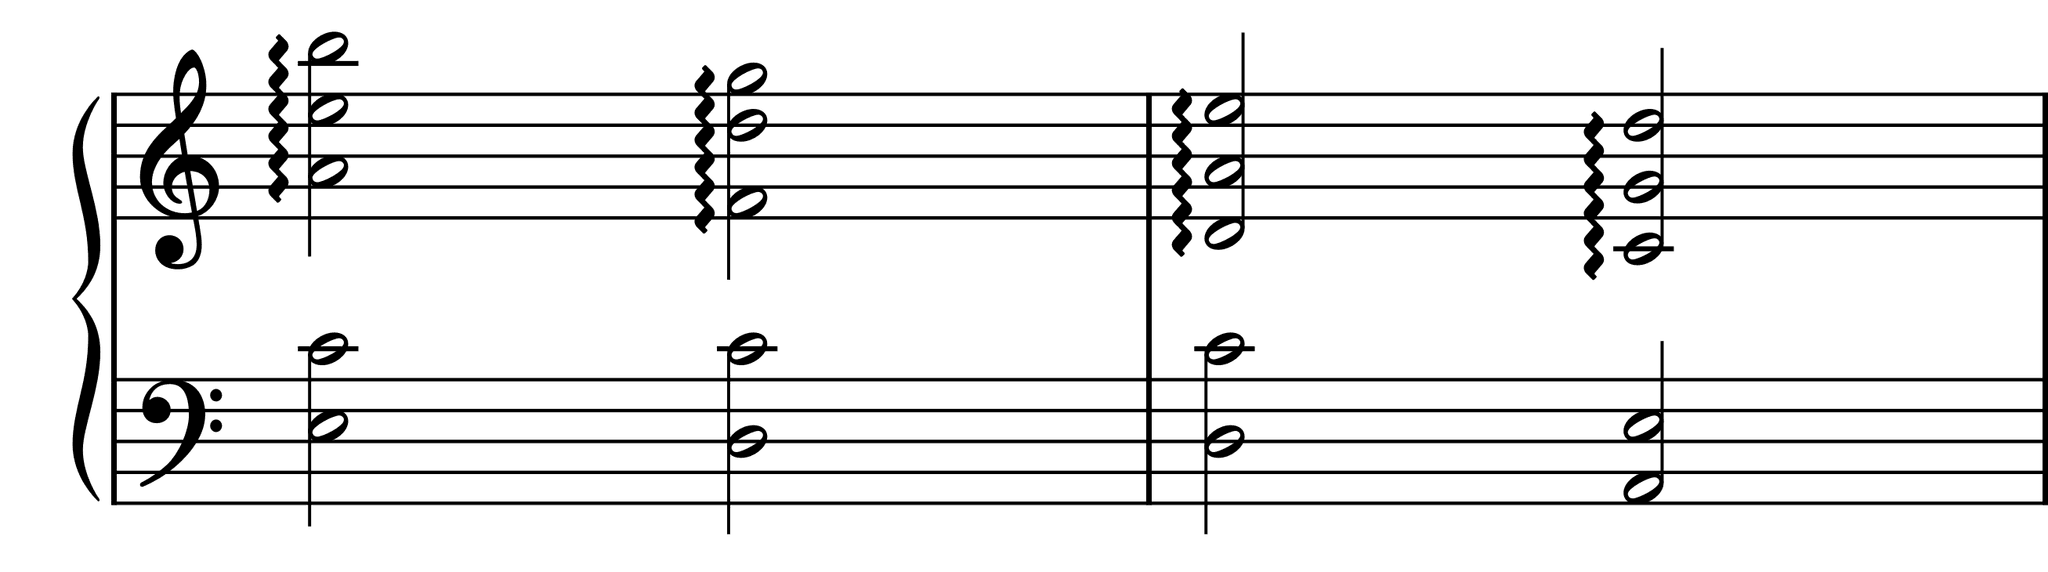
Arpeggios can expand this range for intermediate and advanced pianists, but if you don't include the arpeggio, players will assume they need to be able to strike both notes at the same time. If you want a 9th interval in one hand for an intermediate player, consider using an arpeggio line like this.
Beginners don't generally work with arpeggios yet, so keep in mind this is often not a good solution to the interval problem for a lower proficiency player.
Realistic Hand Movement Consideration
If you think even a really good piano player will have trouble moving their hand quickly and accurately enough to be ready to play a note that is a good distance from the preceding note in time, you'll want to reconsider it. You might find a workaround using the other hand, or you might not. It's important to know when to try another idea or rework the passage to make it playable if that leap is essential. If you feel like you're setting a player up for failure, it's time to make some edits.
Unlike intervals, there is no rule about how far away you can write one note from another before it's a problem. It all depends on the speed of the piece, what kind of note it's coming from, and whether another hand is available to help out.
Voicing Harmony
With playability sorted out, we can now get to the core of writing music. When first starting out, arrangers commonly encounter issues with presenting clean, well-voiced harmony. Your ears are your best friend, so train yourself to recognize dissonant sounds as well as the ring of clean, well-constructed harmony.
Voice Leading Basics for Piano
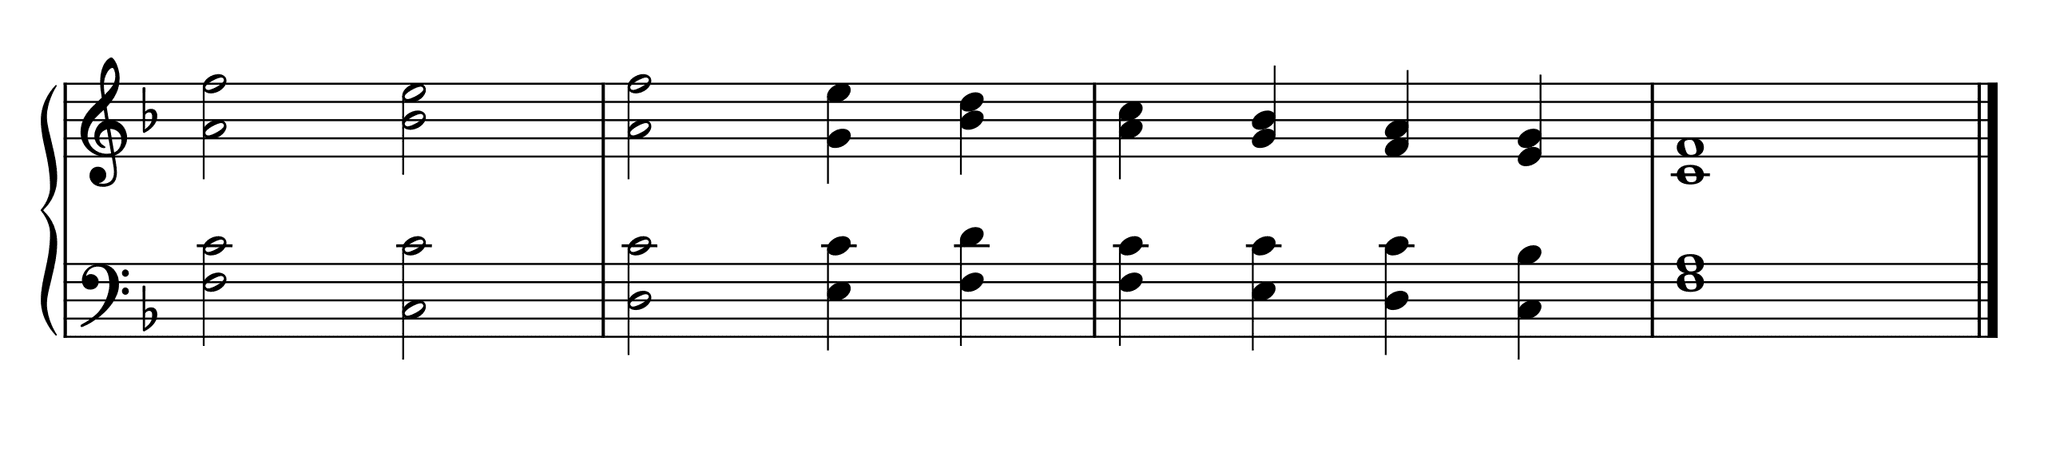
When on the topic of voicing harmony, it's hard to talk about it without starting with voice leading. Voice leading is a broad topic, but at its core is the idea of treating each note as a vocal line — one that should be smooth, melodic, and not too jumpy. Bass movement can be considered separately, and the remaining voices can be thought of as an exercise in supporting the melody. Well voice-led harmony sounds good and is often easier to play.
Take for example a melody using root position chord voicings in the left hand with stacked triads.
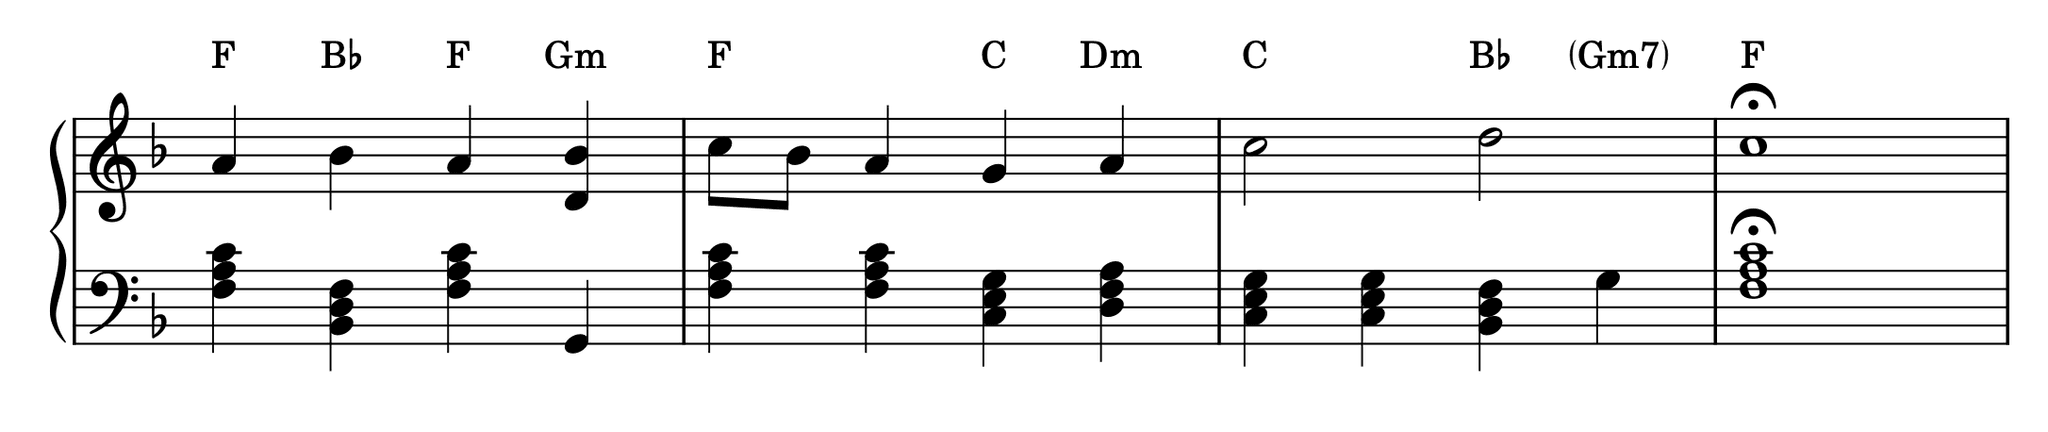
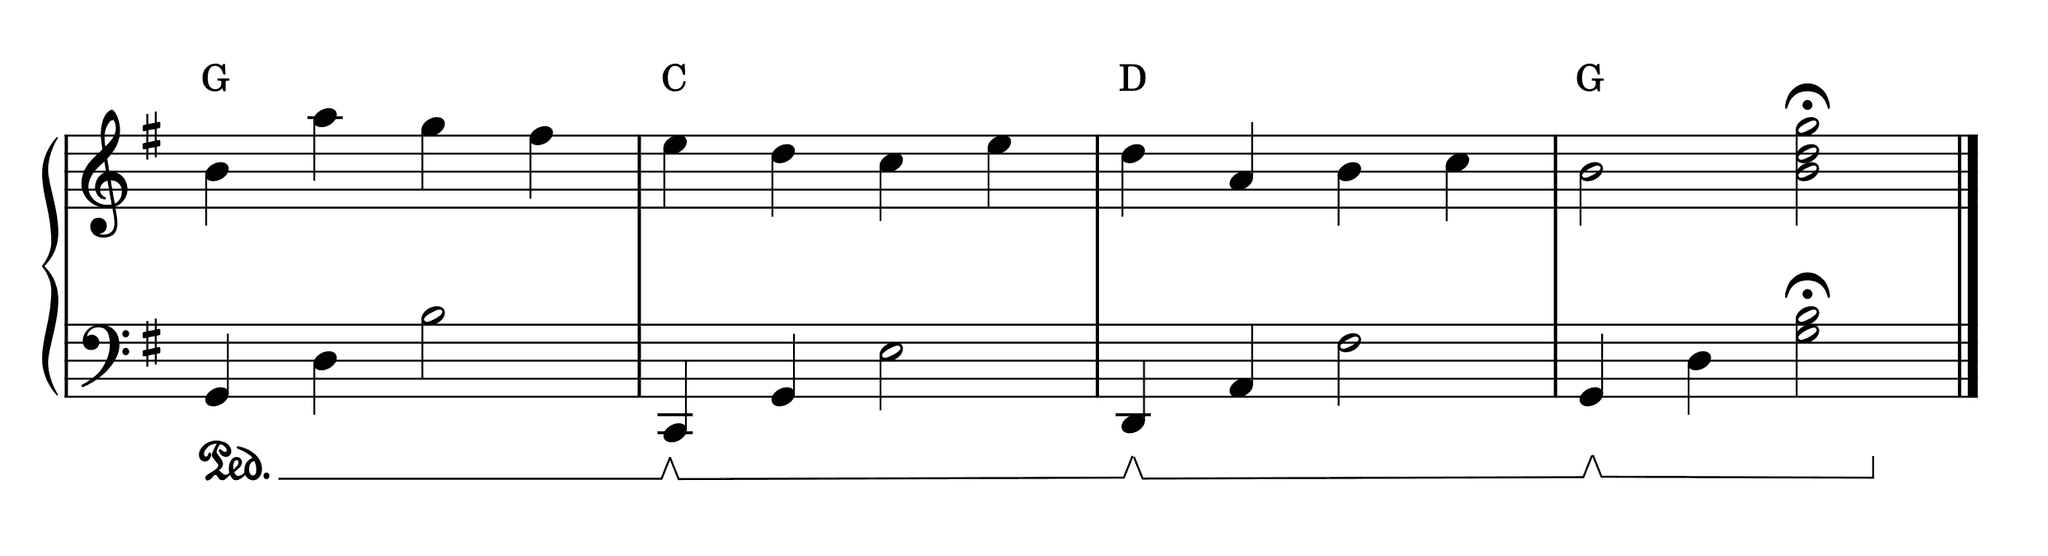
We could move some of the harmonic support closer to the melody, use smooth voice-leading, and even try to make the bass line smoother at times, resulting in this.
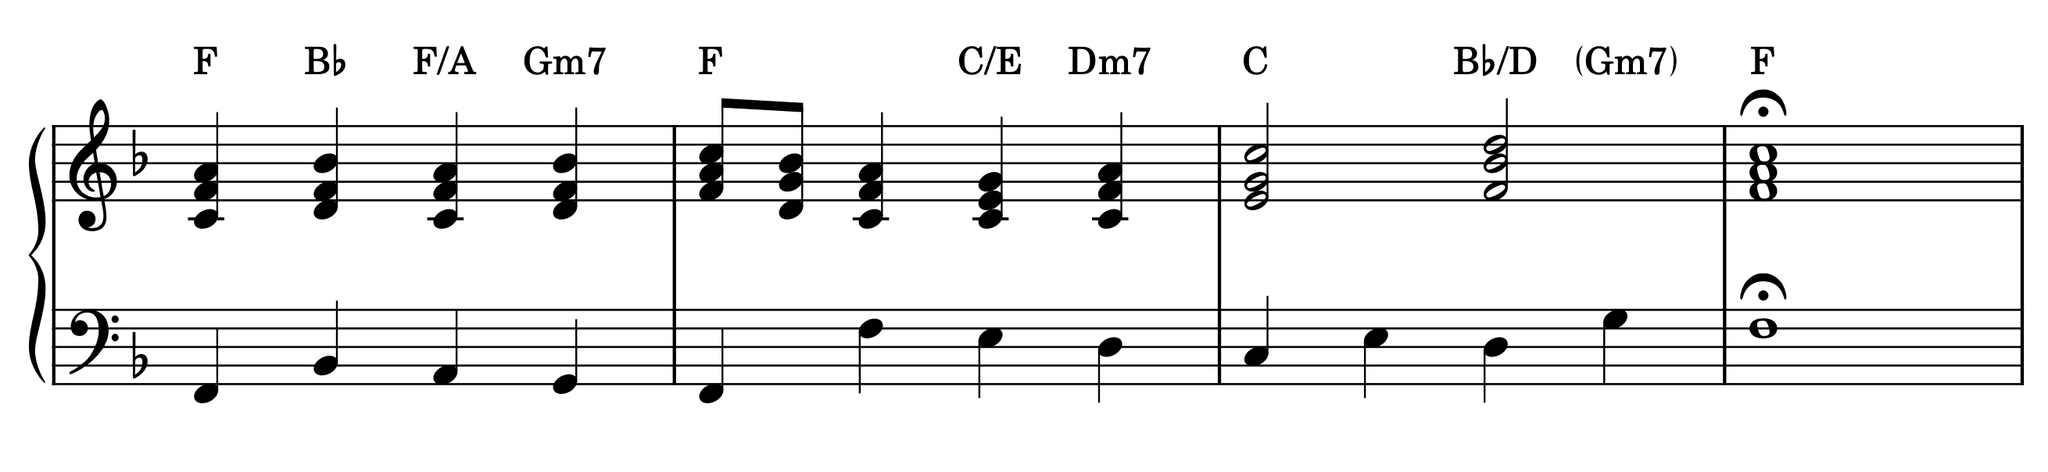
Picture being tasked with singing the melody of the individual notes in the left hand of the first example compared to how both hands are structured in the second example. It would be much harder to do and less melodic. Having the supporting harmony structured using melodic lines to match your main melody adds a more complex and pleasing sound.
Widening Arpeggiated Chords
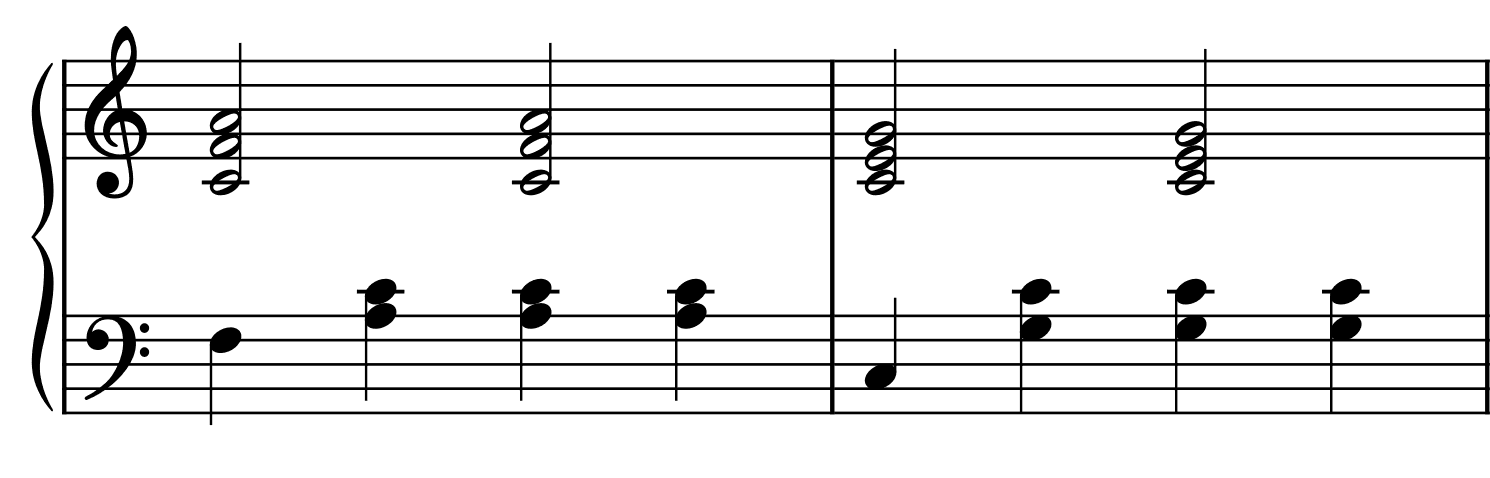
Another harmonic trick every piano arranger should know about is voicing chords with a washy, sustained 1-5-3 arpeggio. This voicing is played using the sustain pedal, which keeps the notes ringing as you move through them — something that would be impossible for one hand to accomplish without it. This technique is a great way to create a wide-sounding set of notes that ring well together for root position chords.
For example, a C major triad should be played as a low C, G above that, and E above that.
Avoiding Muddy Voicings in the Low Register
While stacking thirds is the harmonic fabric of western music (also known as tertian harmony), there is a limit to how low you can go before it just sounds like mud. Depending on your preference, B♭2 or A2 is generally the lowest point at which stacked minor or major thirds still sound pleasing. Anything lower than that starts to sound more and more "muddy."
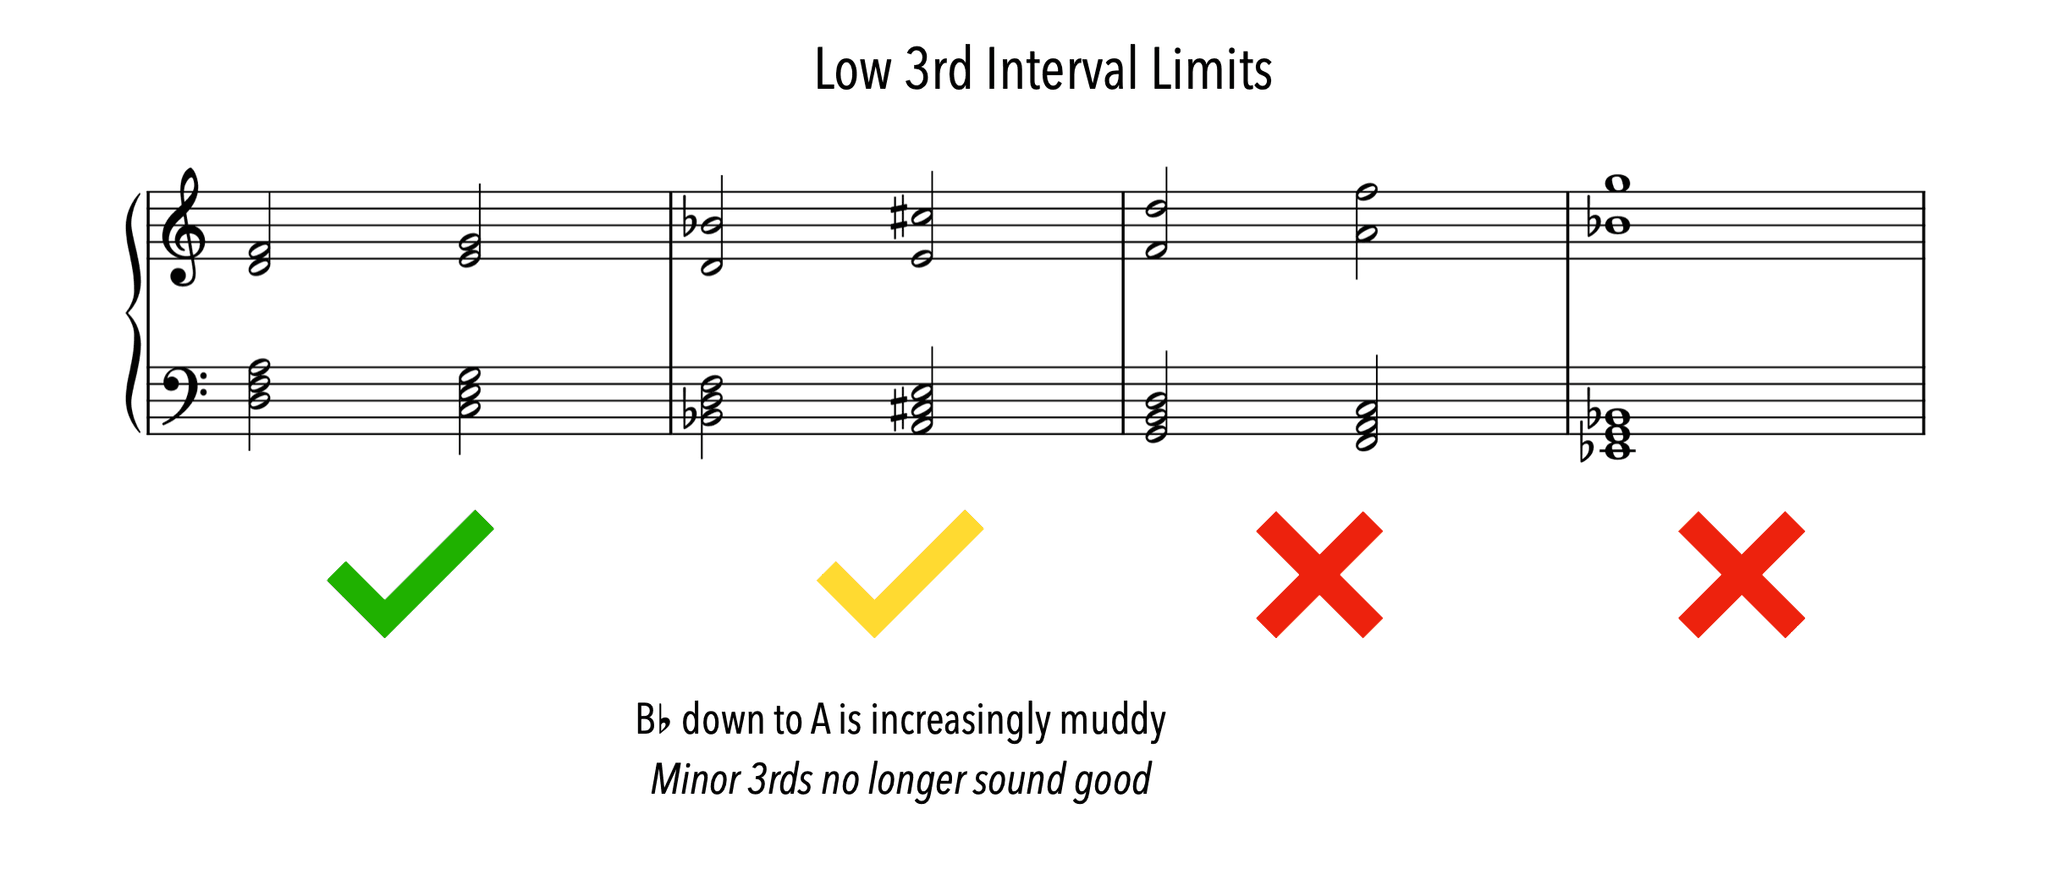
Like everything else around music, we want to tie our ears into the equation. It's one thing to know that A2 is the last place you should consider adding a major 3rd on top of, but ideally you can hear it when it happens. Try playing the above example and see if you can hear the harmony turn to mud.
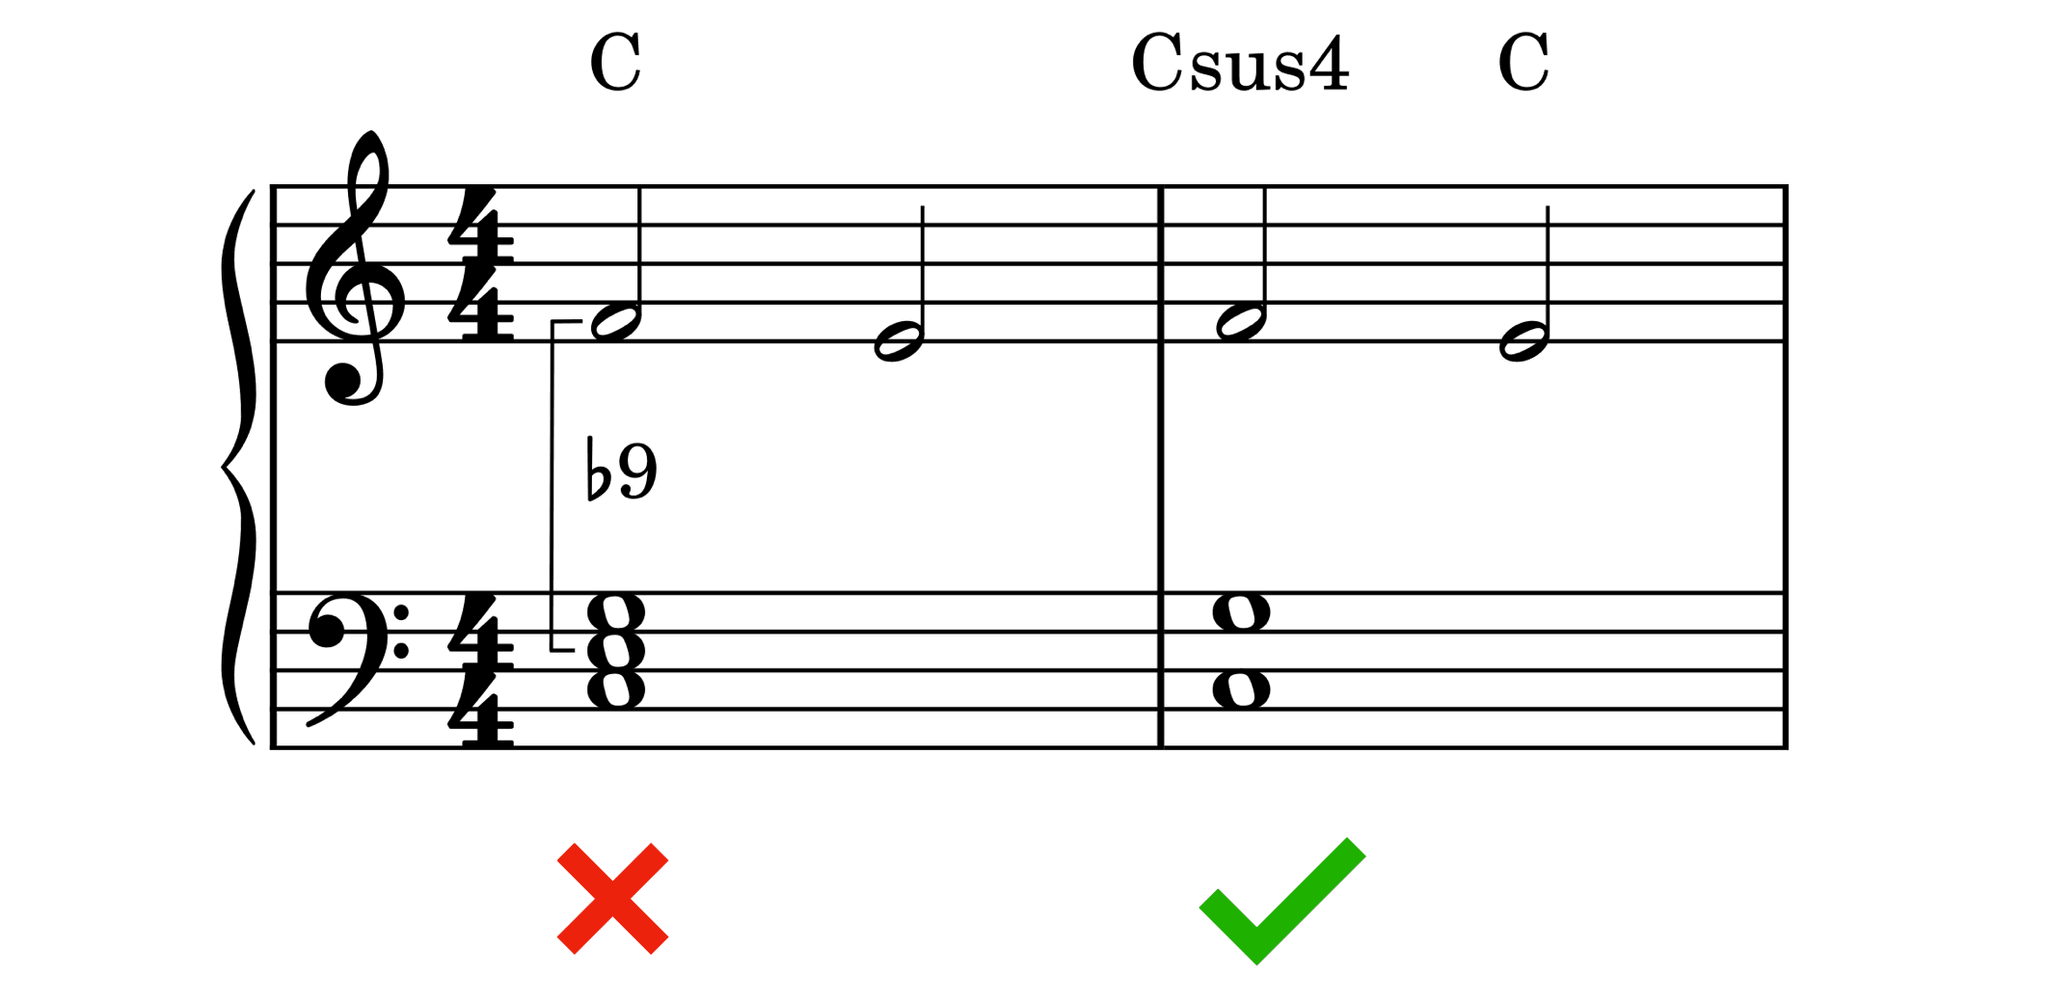
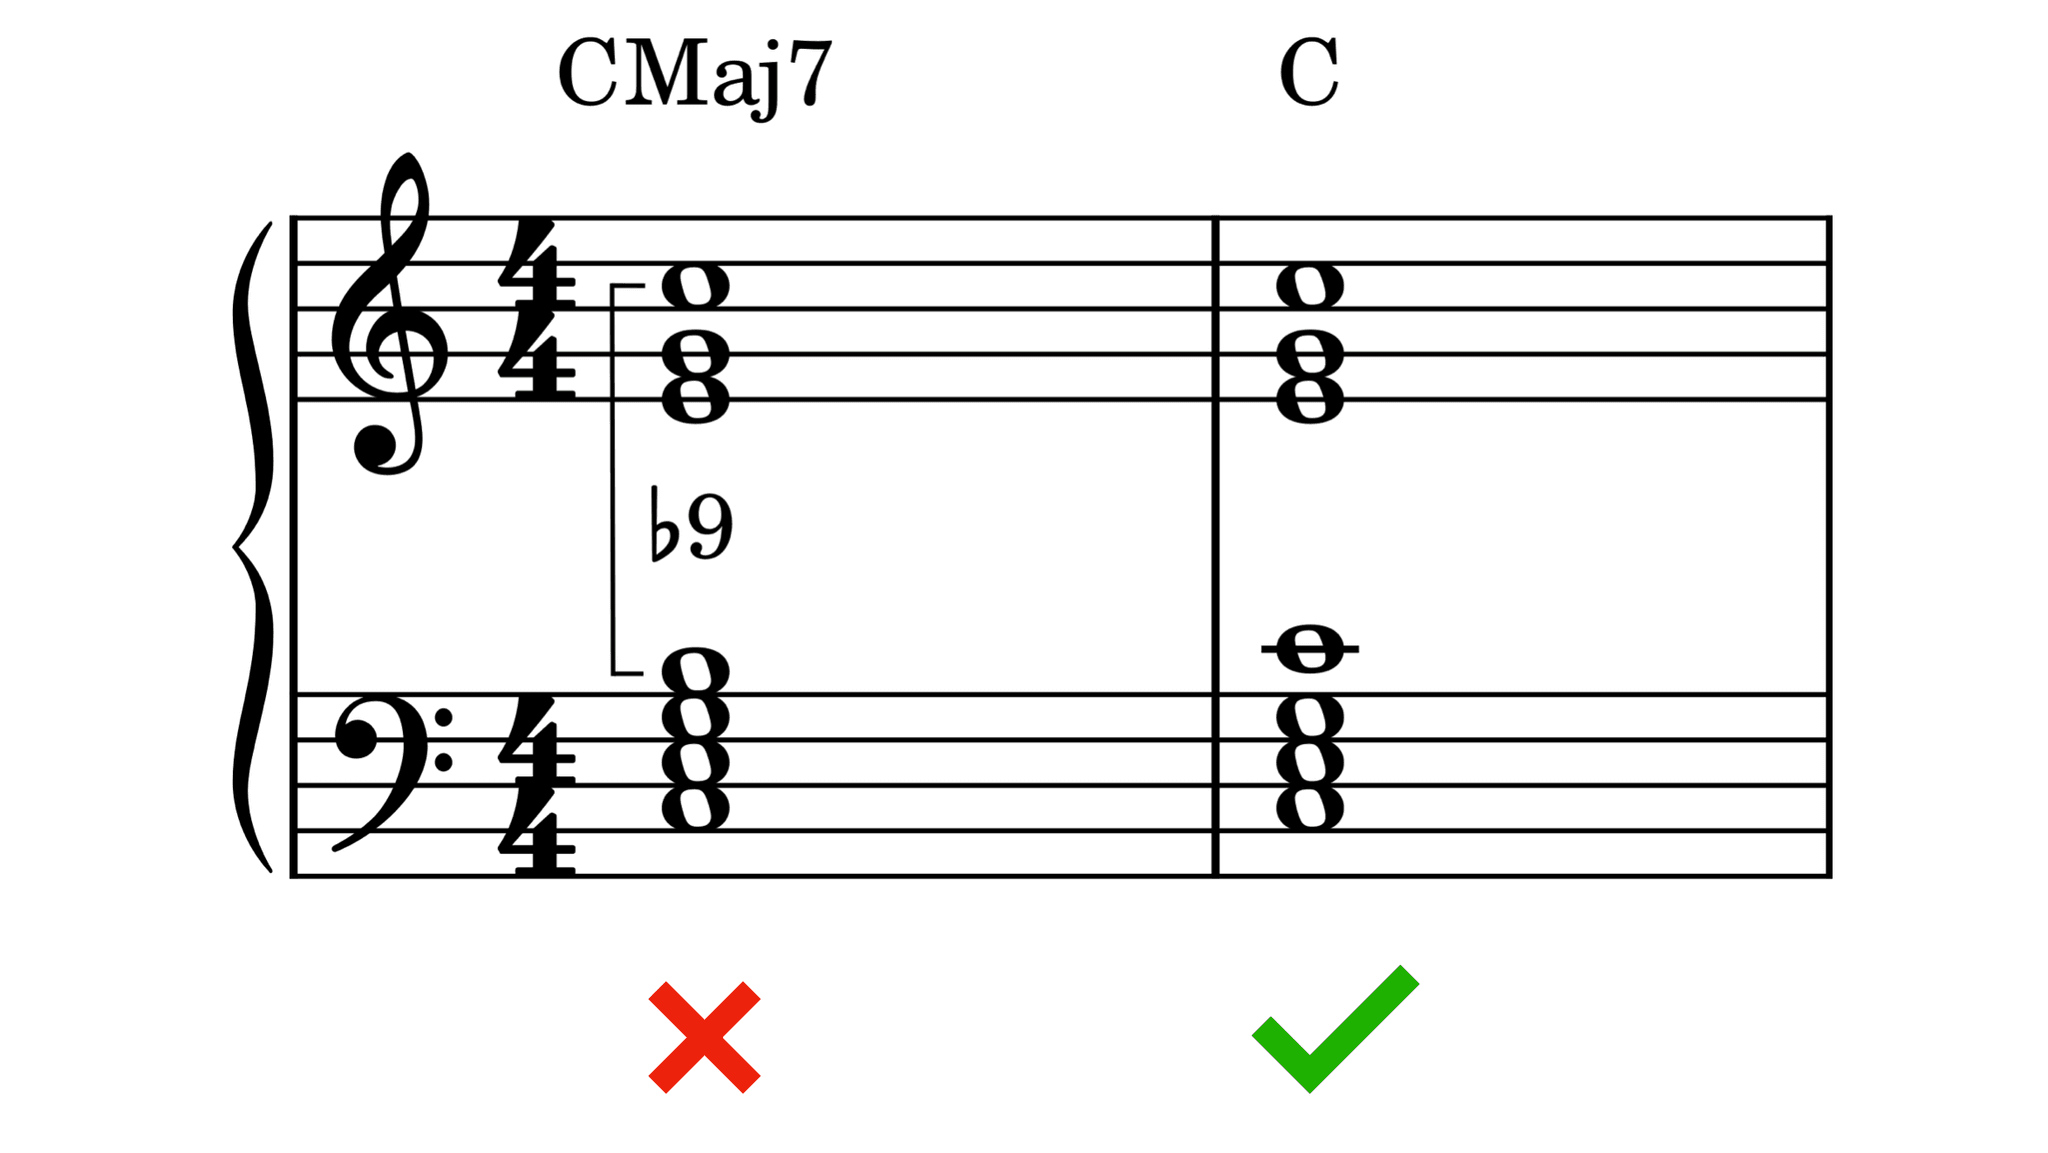
The ♭9 Interval
The ♭9 interval is a sneaky one — arrangers new to the craft can sometimes find a passage sounding dissonant without knowing why, and the ♭9 is often the culprit. The ♭9 interval is simply an octave plus a half step, so C4 to D♭5 for example. While we encounter this interval all the time in music, we need to be careful about stressing two notes that create this interval together. While a dominant 7th chord can support the ♭9 interval nicely, in most other contexts it sounds quite dissonant.

Two situations in particular get arrangers in trouble: stressing a melody note on the 4 with a major chord, and stressing a melody note on the 1 on a major 7th chord.
If you are stressing the 4 in the melody against a major chord, use a sus4 chord instead until the melody resolves. If you plan to resolve it quickly, just use the 1 and 5 from the chord in the left hand.
If you have a melody note on the root of a major 7th chord, be sure it is not creating a ♭9 interval as seen below. In most cases, a regular major triad is the better choice when the main melody note is the root of the chord, rather than a major 7th.
Presentation
With playability and voicing harmony now on our radar, we turn our attention to the presentation of our arrangements.
Using Voices
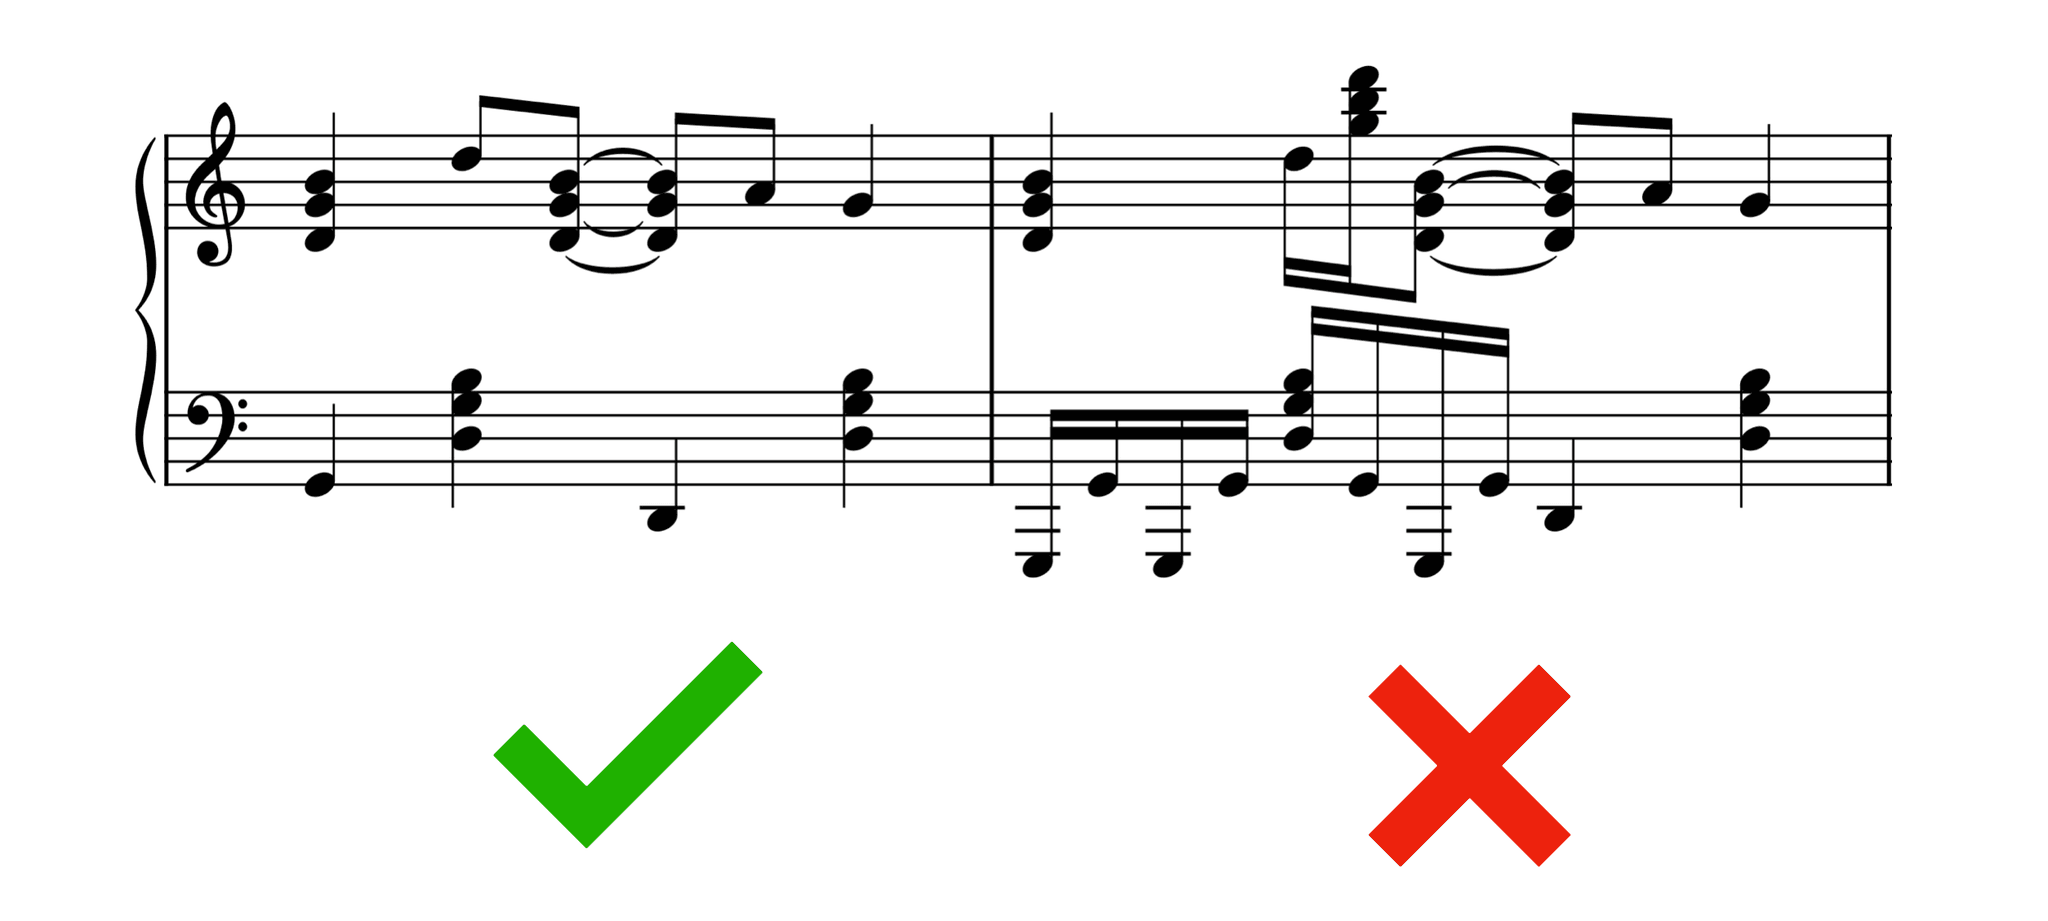
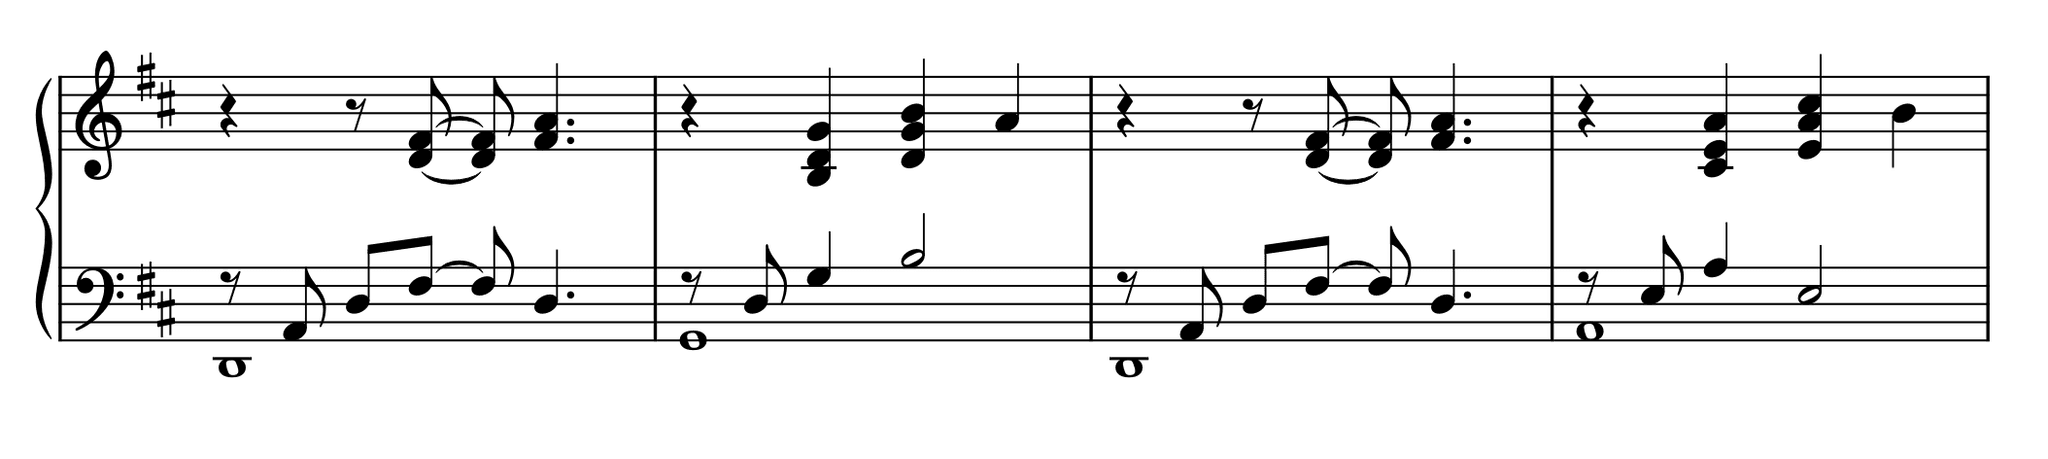
Multiple voices, when used correctly, are the perfect way to convey how a section should be played and can even give clues about sustain pedal usage. One common mistake in piano music is treating it like vocal ensemble music, which sometimes separates voices even when they share the same rhythms. Some older piano scores use this approach as well, but this kind of writing is not normally found in modern conventions. For example, take this excerpt:

This example unnecessarily separates the notes into two voices. Instead, with all notes being the same note duration, it should be presented all in voice 1 like this.
Multiple voices can also imply sustain pedal usage by showing a note ringing out over other notes that would make it impossible to play without using the sustain pedal. An intermediate or later player can typically connect the dots that sustain is required when encountering the kind of notation seen below.
This is far from the only way to imply a sustain pedal being used, and there are many other more advanced ways to use multiple voices in your writing. As you get more experienced, you will become more aware of how multiple voices are used, when to hide rests in different voices, and generally what you are asking the player to do when presenting multiple voices.
Showing the Same Pitch in Different Hands
It's easy to copy and paste a pattern you used earlier and not notice that the left hand pattern now collides with the right hand. Be careful not to repeat a pitch in one hand that is already shown as held in the other. This can cause confusion for the player.
Above we see the middle C on beat 2 of the left hand repeats the same C on beat 1 in the right hand that should be held for two beats, and on beat 3 both the left hand and right hand are shown striking the middle C. All of this sends mixed signals to the reader who has to then try to interpret what is wrong.
Spacing, System and Page Breaks
Note spacing and thoughtful system and page breaks are subtle touches that help musicians more quickly make sense of what they are reading.
There is an art to deciding where system breaks should fall. When preparing music, new sections or ideas should ideally begin on a new system. We also want to place page breaks where the reader can turn the page without interrupting their performance. If the arrangement exceeds 3 pages, or appears in a book where only 2 pages are visible at once, pay close attention to placing page breaks where a player without a dedicated page turner can turn the page without lifting either hand.
If you think the notation looks distractingly close together or spaced apart, make adjustments until the music is legible. When a section like a verse or chorus is complete, use a double bar at the end of the last measure to indicate that a new section is beginning. Once double bars are added, try to organize your systems so that those measures fall at the end of a system where possible. This extra step helps further reinforce that a new section is starting when it starts on a new system versus mid-system.
If you are using boxed text or rehearsal marks to show new sections of your arrangements, these should also be ideally situated on top of the first measure of the section and aligned to the left side of the page.
Finally, try to make the last page of the piece have the same number of systems as the other pages. While this isn't always possible, do your best to avoid leaving the last page sparse. Sometimes page 1 can have fewer systems because of title and composer text, and that is OK.
Closing Thoughts
Taking the plunge into arranging piano music is an exciting move for any musician and, like many other aspects of music, being creative is the most important part. This particular blog is focused more on the nuts and bolts aspects of arranging, and while these tips will make your ideas sound better and ensure they can actually be played, the real magic will always be in your creativity.
Your creativity could be dismissed, however, by players who assume that if your playability considerations or voicings seem amateur, your actual ideas probably are too. While this attitude is short-sighted, it's also a reality. Earlier, we mentioned that the overall goals of any arrangement should be to sound great, be playable, and be easy to read. Think of your creativity as your personality, and the notation you create as your resume. You want musicians to notice your arrangements for the right reasons, so they can focus on what really matters — performing your creation.